Mar 28, 2011
Mar 27, 2011
kureopatora scarf- Part 2
Kureopatora - Part 2
Row 1: Knit in the front, then purl in the back of the first stitch, SSK. Turn work over so the next row heads back in the other direction. Note that this first row is only 3 stitches long.
Row 2 and all subsequent even numbered rows: Work P1, K1 ribbing as established.
Row 3: Purl in the front, then knit in the back of the first stitch, P1, SSK. Note that from now on this row-ending SSK will be composed of one stitch worked on the previous row, plus one stitch from the dormant stitches on the left hand needle. Turn work over so the next row heads back in the other direction. You now have 4 stitches in the row.
Row 5: Knit in the front, then purl in the back of the first stitch, K1, P1, SSK. Turn work. You now have 5 stitches in the row.
Row 7: Purl in the front, then knit in the back of the first stitch, P1, K1, P1, SSK. Turn work. You will now have 6 stitches in the row.
Continue to work in the manner of rows 5-8, adding one stitch at the edge of each right-side row in the established rib pattern until you have incorporated all of the dormant stitches on the left hand needle. You will again have 30 stitches on the needle. At this point your segment is done. To do the next one, flip the work over (the and begin again from Row 1 of the Entrelac section). Continue adding entire trumpet shaped sections until your scarf is of sufficient length.
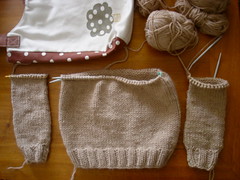
It looks like this after the two segments are established:

Row 1: Knit in the front, then purl in the back of the first stitch, SSK. Turn work over so the next row heads back in the other direction. Note that this first row is only 3 stitches long.
Row 2 and all subsequent even numbered rows: Work P1, K1 ribbing as established.
Row 3: Purl in the front, then knit in the back of the first stitch, P1, SSK. Note that from now on this row-ending SSK will be composed of one stitch worked on the previous row, plus one stitch from the dormant stitches on the left hand needle. Turn work over so the next row heads back in the other direction. You now have 4 stitches in the row.
Row 5: Knit in the front, then purl in the back of the first stitch, K1, P1, SSK. Turn work. You now have 5 stitches in the row.
Row 7: Purl in the front, then knit in the back of the first stitch, P1, K1, P1, SSK. Turn work. You will now have 6 stitches in the row.
Continue to work in the manner of rows 5-8, adding one stitch at the edge of each right-side row in the established rib pattern until you have incorporated all of the dormant stitches on the left hand needle. You will again have 30 stitches on the needle. At this point your segment is done. To do the next one, flip the work over (the and begin again from Row 1 of the Entrelac section). Continue adding entire trumpet shaped sections until your scarf is of sufficient length.
It looks like this after the two segments are established:
Mar 26, 2011
kureopatora scarf- Part 1
Materials
*project: kureopatora snake scarf
designer: Kim Brody Salazar
* US #6 needles
* 1 skein - Swiss Mohair (universal yarn)- color 2503 - Ram
* I cone - Ramie Cork yarn (A-166-Habu) color 13
As for working method, this scarf is done in a pretty standard Entrelac edge column technique - think Entrelac project reduced to just the right and left most columns, without the basket weave effect sections between.
Row 1: Cast on 1 stitch, knit in the front, then purl in the back of this stitch [2 stitches on needle]
Row 2: Knit in the front, then purl in the back of the first stitch, K1 [3 st on needle]
Row 3: Purl in the front, then knit in the back of the first stitch, P1, K1 [4 stitches on needle]
Row 4: Purl in the front, then knit in the back of the first stitch, P1, K1, P1 [5 stitches on needle]
Row 5: Knit in the front, then purl in the back of the first stitch, finish row in established K1, P1 ribbing [6 st on needle]
Row 6: Knit in the front, then purl in the back of the first stitch, finish row in established K1, P1 ribbing [7 st on needle]
Row 7: Purl in the front, then knit in the back of the first stitch, finish row in established P1, K1 ribbing [8 st on needle]
Row 8: Purl in the front, then knit in the back of the first stitch, finish row in established P1, K1 ribbing [9 st on needle]
Continue rows 5-8, adding one stitch in each row but doing it to maintain the K1, P1 rib pattern. Keep doing this until you have 30 stitches on your needle.
This is how it looks like after 30 rows:
 Video copied from http://www.youtube.com/user/lunaknits
*project: kureopatora snake scarf
designer: Kim Brody Salazar
* US #6 needles
* 1 skein - Swiss Mohair (universal yarn)- color 2503 - Ram
* I cone - Ramie Cork yarn (A-166-Habu) color 13
As for working method, this scarf is done in a pretty standard Entrelac edge column technique - think Entrelac project reduced to just the right and left most columns, without the basket weave effect sections between.
Row 1: Cast on 1 stitch, knit in the front, then purl in the back of this stitch [2 stitches on needle]
Row 2: Knit in the front, then purl in the back of the first stitch, K1 [3 st on needle]
Row 3: Purl in the front, then knit in the back of the first stitch, P1, K1 [4 stitches on needle]
Row 4: Purl in the front, then knit in the back of the first stitch, P1, K1, P1 [5 stitches on needle]
Row 5: Knit in the front, then purl in the back of the first stitch, finish row in established K1, P1 ribbing [6 st on needle]
Row 6: Knit in the front, then purl in the back of the first stitch, finish row in established K1, P1 ribbing [7 st on needle]
Row 7: Purl in the front, then knit in the back of the first stitch, finish row in established P1, K1 ribbing [8 st on needle]
Row 8: Purl in the front, then knit in the back of the first stitch, finish row in established P1, K1 ribbing [9 st on needle]
Continue rows 5-8, adding one stitch in each row but doing it to maintain the K1, P1 rib pattern. Keep doing this until you have 30 stitches on your needle.
This is how it looks like after 30 rows:
Video copied from http://www.youtube.com/user/lunaknitsMar 23, 2011
23

Today is my brother's birthday!! He's turning 63 and he's better take a deep breath to blow up 63 candles. have fun!!! your sis, Gi
Mar 19, 2011

Mar 13, 2011

Mar 12, 2011

Mar 7, 2011

Subscribe to:
Posts (Atom)